Render Passes for Maya
Written by Andrew Chapman
Introduction
Render Passes for Maya is a plugin that allows you to render any number of
custom render passes whilst maintaining a single maya scene file.
Maya itself has only a rudimentary level of support for creating render passes.
Maya provides you with render layers (where you can specify sets of objects to be
rendered separately) and also some predefined render passes (beauty, colour, shadow,
diffuse and specular).
This plugin goes much further, allowing you to override literally any aspect of
your scene depending on which pass you are currently rendering. For example, you
can assign specific shaders for each pass, enable/disable lights and shadows, modify
object visibility (including primary/secondary rays) and customise render globals
settings for each render (e.g. turning on and off raytracing).
Because Render Passes for Maya makes real changes to your scene (as opposed to relying
on support for passes in the renderer), it should be fully compatible with any rendering,
export or pipiline system you have. For example you could have a single scene for rendering
out some passes using the Maya renderer, some using RenderMan, and some for exporting
to another tool in your production pipeline.
Installation
To install Render Passes for Maya, simply unzip the archive to a directory on your system, and
add this directory to your MAYA_PLUG_IN_PATH and MAYA_SCRIPT_PATH locations. This is normally
done by editing your maya.env file.
Alternatively, you can copy the RenderPass plugin into one of your existing MAYA_PLUG_IN_PATH
locations, and copy the MEL files from the package to a directory somewhere within your
MAYA_SCRIPT_PATH locations. You should also copy the HTML and PNG files to one of your MAYA_SCRIPT_PATH
locations so you can access the online help from within Maya.
After updating your paths or copying the files, reload Maya and open the plugin manager. The
RenderPass plugin should now be listed and you can load it (you can also set it to be automatically
loaded whenever you start Maya). There may be multiple versions listed - if so select the one which looks
like it matches your operating system and Maya version (Maya won't let you load the wrong one though).
For more help on installing custom plugins, please review the Maya documentation. If you're still
stuck see the Support section at the bottom of this page.
Usage
When you load the Render Passes plugin, you will find a new menu item added to Maya's main menu bar
when you are in the Rendering interface mode:
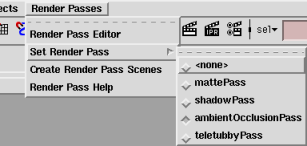 |
The first entry in this menu brings up the new Render Pass Editor, from which you can
define your passes and overrides. The Set Render Pass item brings up a sub-menu
listing all your current passes, allowing you to easily apply any one of them to the current
scene (you can tear-off this menu to float over your workspace). The menu item labelled
Create Render Pass Scenes brings up a window which allows you to optionally save out
a render scene for each one of your passes.
Finally, the Render Pass Help menu item brings up this online help from within Maya
(NOTE: this will only work if you can normally launch Maya's own online help from within
the program - sometimes under Linux this requires a browser window to be open
on your desktop beforehand).
For a quick run through using the plugin, you can read this simple tutorial.
|
Render Pass Editor
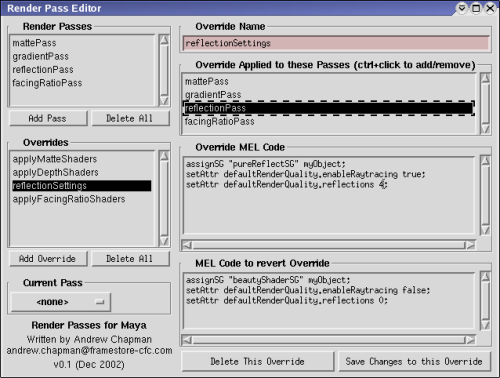
Using the Render Pass Editor you can create render passes and specify commands
to be executed when you apply that render pass to your scene.
After creating some passes and giving them recognizable names, you then add your
overrides and assign these overrides to the passes they should be applied to.
An override consists of a name (so you can easily recognize it later) and two chunks of
MEL code. The first section of MEL code is executed when a render pass containing that
override is applied, and the second section of MEL code is executed when the effects
are to be removed (i.e. when switching to another pass, or to have no pass applied).
In the simplest case you can just have one override for each of your passes - for example
a render pass named ShadowPass and an override named ShadowOverride.
However, with a complex scene you might find yourself duplicating a lot of code amongst your
overrides to do common things, such as turning on raytracing calculations. Instead, you could
have an override named 'turnOnRaytracing' which activates raytracing in your render
globals, and you have this override active in your 'beauty' and 'reflection' passes,
and off in your 'mattes', 'depth' and 'diffuse' passes (for example).
As a general rule, it is best to keep each override to performing a single simple task, and
have them on or off for different passes.
Writing Override MEL Code
The only way for render passes to be able to modify all aspects of your scene is to
specify the required changes using MEL code. Unfortunately this seems daunting to anyone who isn't
familiar with MEL scripting - but it really is quite simple for our purposes. The best way to
know what code you need is to look in the script editor whilst you manually make changes
to your scene. For example, if you wish to change the colour of a material for a certain
pass, then select the material, set the new colour, and you will see in the script editor
something like this:
setAttr "lambert1.color" -type double3 1 0 0;
You can see that it is setting three values for the color attibute of the material
lambert1 which would make it pure red in this case. Set the colour back how you want
it and you will see the code that reverts that change again, e.g:
setAttr "lambert1.color" -type double3 0.5 0.5 0.5;
Many changes aren't shown in the script editor by default, and if you are trying to work
out how a certain change is made you can turn on the Echo All Commands option in the
script menu of the script editor. This will cause many more commands to be shown as
they are executed in Maya. This will cause a lot more output, and you will have to do
a bit of searching through to find just the minimal bit of code that will affect the change
you're after.
I've also find that a great way to determine how to do something is to look in Maya's own MEL scripts
to see how it does things. This can be a little tricky, but using a search program to look for
little bits of text (such as the label of a menu that performs the function) recursively in
Maya's scripts directories you can usually find what you're after.
If you are still stuck, you should find someone who does know MEL coding to help you out.
The Maya forums on the excellent HighEnd3D site are
also a great source of help. You shouldn't really be asking any questions specific to using this
plugin on the Maya lists though - see the Support section at the end of this page for that.
Quick Tutorial & Demo Scene
The concepts of using overrides and passes can be somewhat confusing for new users. There
is a small tutorial available to take you through the steps of creating a very simple
render pass setup. Click here to jump to the tutorial.
You should also find a demo scene included in the package you downloaded (with versions for
Maya4.0 and Maya4.5). This scene contains a number of pre-configured render passes. Just open
the render view, and select each pass in turn and render it to see the results. You can then
inspect the override code in the Render Passes Editor to see how it works.
MEL Code for Common Override Tasks
When writing overrides, there are certain things that you are going to want to do quite
regularly, so I will list the code required here. All you will need to do is change the
object/material names in these examples to suit your scenes.
| Task | Override
Code | Code to Revert |
| Assign a Shading Group* |
source "buildShaderMenus.mel";
assignSG specialMaterial_SG myObject; |
source "buildShaderMenus.mel";
assignSG normalMaterial_SG myObject; |
| Hide an Object |
setAttr myObject.visibility 0; |
setAttr myObject.visibility 1; |
| Turn on Raytracing |
setAttr defaultRenderQuality.enableRaytracing true; |
setAttr defaultRenderQuality.enableRaytracing false; |
| Set Reflection Trace Limit |
setAttr defaultRenderQuality.reflections 4; |
setAttr defaultRenderQuality.reflections 0; |
| Set Refraction Trace Limit |
setAttr defaultRenderQuality.refractions 2; |
setAttr defaultRenderQuality.refractions 0; |
| Set Shadow Trace Limit |
setAttr defaultRenderQuality.shadows 6; |
setAttr defaultRenderQuality.shadows 0; |
Turn off an object's
primary visibility |
setAttr myObject.primaryVisibility 0; |
setAttr myObject.primaryVisibility 1; |
*Notes on the 'assignSG' command
This command is part of Maya, but for some reason they chose not to make it accessible until after the
buildShaderMenus.mel script has been sourced. This normally happens when you right-click
on an object. When using the assignSG command in an override, you should source this
script yourself (as shown in the above example) to ensure it is available. This command
prints out a line like // Result: big_ball_matSG // to the script editor - if you get tired
of lots of these appearing when you switch between passes containing assignSG commands, you
can comment out the line that prints this message in the buildShaderMenus.mel MEL script within your Maya installation.
RenderPass Tips:
Here's some quick tips and things to look out for when writing your override code:
- Once you have set an override for some attribute of your scene, remember that if you
later wish to modify it's value in the 'normal' version of your scene then you will
need to change the MEL code in your overrides. If you just make the change to your scene
and not to an override affecting it then the change will be lost next time you apply a
render pass (even if you then set the <none> pass). As setting up your render
passes is often done at a late stage of production, this should not normally be a problem.
- If you are writing code that spans more than one line, make sure you put a semicolon
(;) at the end of each line. This tells the Maya MEL engine where one command ends
and another begins (this goes for all MEL code in Maya, not just for Render Passes).
- If you find you are repeating the same operation for lots of different objects
in the one chunk of override code (e.g. separately hiding a bunch of objects) then
you should think about grouping them or putting them into a set, then you can simply
hide the group/set and it will affect them all at once. Alternatively, you can use
loops and other control flow commands as you normally can in a MEL script to avoid
repetitive code.
- You can put comments into your override code the same as in a normal MEL script.
Any line starting with a double slash (//) is considered a comment, as is any block
of code between a slash-asterisk (/*) and an asterisk-slash (*/) pair. Comments
make it easier for others to understand what is going on, and should be added to
any non-trivial code you write.
- If you get errors in the script editor when switching render passes you should
try testing each line of the override you changed in the script editor. The code
at fault could be in the override section of the pass being applied, or in the
revert code section of any of the overrides.
- If your override code specifies the names of any objects, and those objects
are deleted or renamed you will get errors when you later change passes. You need
to update your override code if you rename or delete objects they refer to. As
setting up your render passes is often done at a late stage of production, this
should not normally be a problem.
Create Render Pass Scenes Window
Render Passes for Maya also provides you with an easy way for saving out one scene
per pass. Selecting Create Render Pass Scenes from the Render menu brings
up a new window:
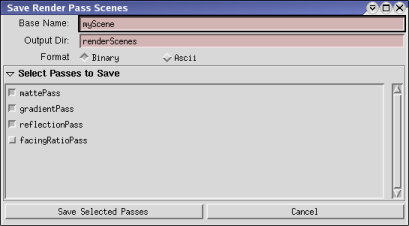
Using the settings shown in the image above, the following files will be written out:
CURRENT_MAYA_PROJECT/renderScenes/myScene_mattePass.mb
CURRENT_MAYA_PROJECT/renderScenes/myScene_gradientPass.mb
CURRENT_MAYA_PROJECT/renderScenes/myScene_reflectionPass.mb
Where CURRENT_MAYA_PROJECT is your currently active maya project. The output
directory should be an existing directory within your current project - usually
'scenes' or 'renderScenes' unless you have created another one yourself.
The only reason why you would need to use the Create Render Pass Scenes
function is if you wish to render all your passes together on a render farm.
If you only need to render one thing at a time, you can stick with your original
scene file - just apply a render pass, render, set another pass, render, etc. If
you apply a pass to your scene and save it, then it will remain setup
for that pass if you perform a batch render using that scene file too.
Render Pass Scripting
The Render Passes plugin is fully integrated into Maya and provides commands for
you to be able to query and modify the passes using custom MEL commands. Here is
a quick
rundown of the commands that the plugin provides:
addRenderPass [-edit INDEX] -name PASSNAME
This allows you to add new render passes. Any new passes will have no effect
until you assign overrides to be associated with that pass. Passing the -edit flag
with a pass index (zero based) allows you to edit the name of an existing pass.
addRenderPassOverride [-edit INDEX] -name [-pass PASSNAME | -nopasses] -overrideCode CODESTRING
-defaultCode CODESTRING
Allows you to add new overrides, and also to edit them (including assigning them
to one or more passes). The -pass flag can be used any number of times to assign
an override to multiple passes. The -nopasses flag is used to remove all pass assignments for this override when in editing mode.
deleteRenderPass -pass PASSINDEX | -override OVERRIDEINDEX
Use this command with either the -pass or -override flags to delete an existing
pass or override. Deleting a pass will automatically remove all references to it
in any overrides assigned to it (but will not delete the overrides themselves).
renderPassInfo -numPasses | -numOverrides | -currentPass | -passName
PASSINDEX | -overrideName OVERRIDEINDEX | -overridePasses OVERRIDEINDEX |
-overrideCode OVERRIDEINDEX | -defaultCode OVERRIDEINDEX
Use this command to query any information about the render passes you have
defined. Use the zero based index when asking about a particular pass or
override. The command returns data in different formats depending on what is
being asked: int for -numPasses/-numOverrides, string for
-currentPass/-passName/-overrideName/-overrideCode/-defaultCode, and a
string array for -overridePasses.
applyRenderPass PASSNAME
This applies an existing render pass to the current scene. The revert code for
all existing passes will be executed, followed by the override MEL code for the
specified pass.
New Feature Ideas and Known Issues
- Add a simple way to render a specific pass from the command line using the original
scene. It would be nice to be able to pass flags like "-renderPass RedPass" to
the maya batch renderer. The best way to do this is probably to supply an alternative
batch render command that accepts all the current flags plus one for specifying a pass
to render. NOTE: you could get this functionality at the moment using
"maya -batch -command ..." but it isn't a simple task for most users.
- Avoid the need to have both 'override' and 'revert' code specified by the
user. There should be some way of using Maya's undo mechanism to keep track of the
changes made by an override, and automatically revert them when applying another render pass.
- There is currently a bug where if you tear off the Set Render Pass menu, this menu will then not be updated if you add, remove or rename passes, even if you close it and tear it offagain. In this event, use either the main menu or the dropdown list in the Render Pass Editor to change passes until you next close and re-open Maya.
History
- v1.00 - Jan 2003 - Initial Release
- v1.01 - Feb 2003 - Fixed bug where overrides can end up being renamed back to their default names. Thanks to Martin Cohen for reporting it.
Support and Feedback
If you're having trouble, or you'd like to make feature suggestions, please
email chapman@technolumiere.com
You can download the latest release of the plugin at http://www.technolumiere.com/